Monday, September 30, 2013

Winter Palette


Original look by BubzBeauty 


The wind is blowing outside, the hot cocoa is brewing and the fire-place is firing up. It’s wintertime! We’re going to go through a simple tutorial to brighten up your eyes and to rekindle your winter glow. 
This winter let your skin radiate through the cold and refresh your winter outlook with our winter wonderland look!


Step 1


Begin by rinsing your face with warm and then cold water to open your pores and close them and pat dry. Apply primer evenly across your face and décolletage area to even out your base and fill in any wrinkles.


Step 2


Sparingly apply concealer to problem areas, including any dark circles and/or blemishes. If required, apply a green colour corrector to counteract the appearance of redness.

*tip: always apply concealer and/or colour corrector to one hand and work off of that. If you apply straight onto the problem area, it will contaminate the appliqué tool; spreading the bacteria the next time you decide to use it.


Step 3


Place a dollop of liquid foundation onto one hand and apply to your face, dipping your foundation brush or sponge onto the amount on your hand. 

Make sure to begin with the applique in the middle of your face and work outwards, so as to avoid that big “line” on the edges of your face. 


*tip: we will be avoiding the use of a foundation powder on the top of the liquid foundation, as we want to highlight the glow and dewey look of your face


Step 4


Apply a base eyelid “primer” which can be either lighter or darker than the colours you decide to use, depending on whether you want the colours to appear more dull or more vibrant.


Step 5


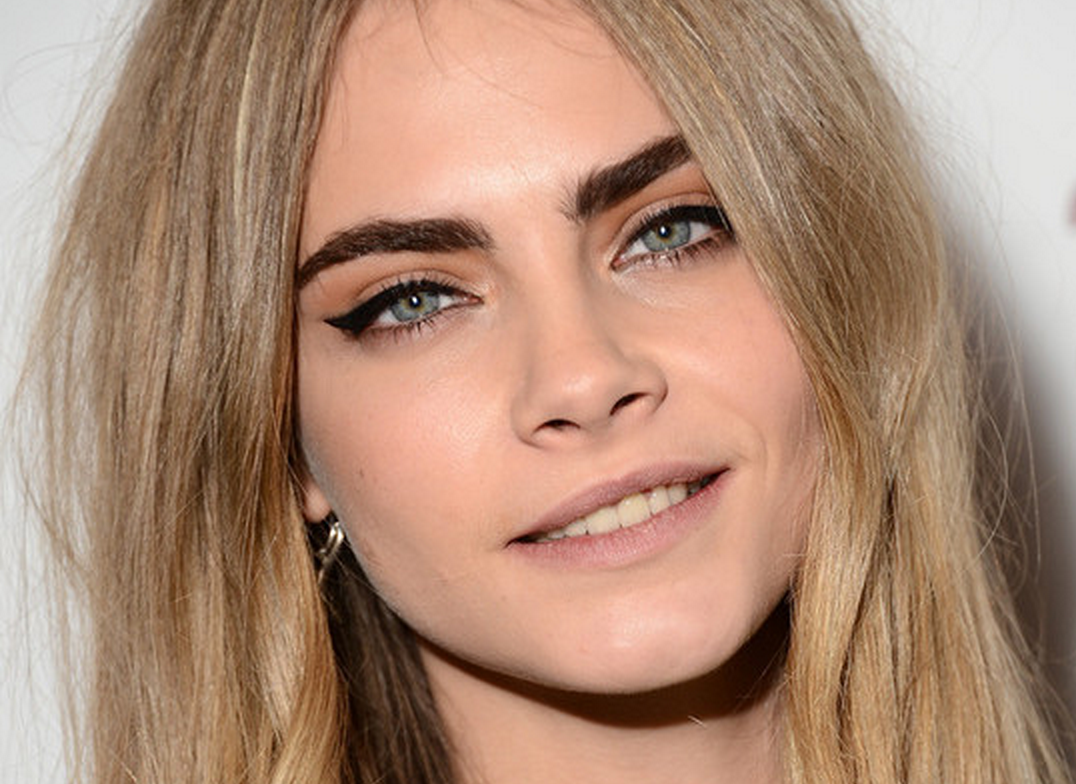
Dab your eye shadow brush into a silver shade and press/pat onto the inner part of your eyelid. Next apply a sky blue shade tothe mid-section of the eyelid. 

Then, using the same technique, apply a darker blue shade to the outer section of your eyelid and finally use a clean blending brush to blend all three colours together. 

If you want more definition, apply a navy blue shade to the outer corners of your eyes, and a white shade to the inner corners of your eyes and blend (refer to Bubzbeauty’s tutorial for a hand with the application technique).

*tip: remember, whilst this is a look that uses bright colours, try to keep the look simple and tasteful, lessis always more


Step 6


Use a lighter, shimmery shade to highlight your brow bone (optional), before using your finger to apply a rough gold shimmer (note: not glitter) across your eyelids, to give it that extra sparkle.


Step 7


Line your eyes with a gel eyeliner by simply dipping an eyeliner brush into the mixture and applying it to the lash
line as you wish. Next curl your lashes with a lash curler and apply coats of mascara if you choose. 
If you want that extra volume in your lashes, refer to our article on 'False Lashes'!

*tip: We suggest the Smashbox Gel Eyeliner in Midnight


Step 8


To complete the look, apply a bronzing face powder to the cheekbone area and the tip of the nose. Note that a little less definitive than a bronzer; a bronzing powder provides a natural glow. Now apply just a touch of blush to your cheekbones for that extra element of glow and finish with a splash of soft pink lipgloss or lipstick.

*tip: We suggest the Nutrimetics Illuminating Face Powder and Silk Mousse Blush


And we’re done! Whilst this was only one look for a Winter palette, don’t be afraid to experiment, using lots of cool tones to add a bit of diversity in your makeup look-book.

Do you have any suggestions of cool make-up ideas for your Winter palette? What are different ways we can change up the Winter look?


Remember to follow us on Twitter :)


This tutorial is based on Bubzbeauty “Winter Wonderland Look”


Inspiration from our fellow gurus:


Sunday, September 29, 2013

Natural looking make-up


Whilst it is fun to experiment with bright and fun colours, sometimes we just want to have make-up that looks like we’re not wearing any! After all, the main purpose of makeup is to accentuate your natural features. In this article we will delve into a few tips and tricks that will help accentuate your features whilst keeping your look natural. 

Let’s get started :)


Step 1:


Apply a light crème eyeshadow that is quite fair in comparison to your skin tone to your eyelids with your finger. 

This will act as a primer or you could simply choose to prime your eyelids, however you feel works best for you. If you have any problem areas that you wish to cover, dab on a minimal amount of concealer onto the areas and thoroughly blend with your finger so that it appears flawless.


Step 2:


Next apply a mineral based eye shadow that is quite similar to your skin tone, onto your eyelids with a shader brush. Make sure to pat the shadow gently onto the section of the eyelid just above the lash line to give it a bit of a pop.


Step 3:


Dab a contour brush into a pink, white or beige toned eye shadow to apply to the crease of your eyelids, depending on your skin tone and then apply the original crème eyeshadow across your eyebrow bone with your finger to brighten your eyes


Step 4:


Then use a white eyeliner to line the innermost part of your eyelids, making sure to get as close as possible to your eye, before applying a white, shimmery eye shadow into the inner corners of your eyes (tear ducts).


*tip: using a white eyeliner makes your eyes appear bigger as it creates an illusion that the white part of your eye is extended. 

This trick can be used before applying darker eyeliner as you normally would, as long as it’s applied closer to the eye than the dark eyeliner.


Step 5:


Curl your lashes. Mascara can have a heavy built-up look, and is possibly one of the easiest ways to determine if you’re wearing makeup, so instead curl your eyelashes to extend them, without losing their beautiful, natural texture. 

Or if you prefer, you may want to opt for a clear mascara, these things do wonders! When you purchase them the packaging looks exactly like normal mascara except when you apply it, it extends your lashes still keeping that fresh, natural look!


*tip: clear mascara can also be used to whip your brows into shape, see our article on ‘Eyebrows’ and tell us what you think! 


Step 6:


Finally, dab on a silk or crème based blush to your cheeks, a light application of bronzer (if you choose) and aquick slick of lip balm or lip gloss and you’re good to go!

*tip: to add a bit of a dewey summer sparkle, we suggest the Nutrimetics Illuminating Shimmer stick, which can be applied to any pat of the body (we suggest the cheek area and cupids bow)


Helpful hints:


  • Try to get yourself into a continual routine of looking after your skin, skin that is nourished and moisturised provides the best base (see our article on ‘How to look after your skin’)

  • If you are still opting for something a little heavier, you might want to choose either a BB cream or a CC cream. They both infuse moisturiser, primer, foundation and sunscreen in one!

  • Or if you are looking for a little powder, apply a dash of mineral powder across your face, making sure to use a large brush so that the amount is spread across a wide surface, making it a thinner layer


And we’re all done! Simple, natural, understated. A natural look is always in fashion :)


What are your tips and tricks to accentuate your natural features? Was our article helpful?

Remember to follow us on Twitter :)


This tutorial was inspired by Sabsbeauty's tutorial below:


Some of the beautiful ladies who work the natural look with such ease!

Adrienne Bailon


Shay Mitchell


Nina Dobrev


Some other tips from our fellow gurus :)


Isabel Zipevski
pictures by:

Wednesday, September 25, 2013

Eyebrows


It is 2013 and BIG & full eyebrows are in and the hottest trend right now. Going are the sparse, unfull eyebrows that make us look unyouthful. Hopefully, for everyone’s sake it will be a thing of the past we for one our in love with fuller eyebrows. Even the supermodels like Cara Delevingne, Camilla Belle and Chanel Iman are rocking them with style.


How can you be on trend just like them?

Stop tweezing and waxing those eyebrows of yours away!

Well you can follow this tutorial we created just for you that will enhance your brows to make them appear BIGGER & fuller.


What you will need:


  • eyebrow comb
  • eyebrow pencil
  • eyebrow gel (looks like invisible mascara)


Step 1:

Using a brow comb, comb your eyebrows upwards.


Step 2:

With the brow pencil outline your eyebrows then gently fill them in with light strokes. Start at the arch and the apply less and less as you come closer to your nose. Otherwise, you could risk your eyebrows looking a bit funky, or in other words a bit funky as i like to call it!


Step 3:

With the brow gel apply sort of like how you would apply mascara. Starting at you eyebrow close to your nose, apply upwards and when past the arch apply less upwards and more downwards, whatever suits you.


For the visual learners, here is a tutorial in picture steps:


Ta Da!!! You our friends are now rocking the BIG & full eyebrows that is sweeping this world by storm on trend.


Let us know what you think. Any tips of your own? What's your favorite eyebrow pencil?


Just comment below and remember to subscribe and follow us on Twitter. :)


Tuesday, September 24, 2013

How to look after your skin


Whilst it is a fun and a creative venture to play with the designs and different styles of make-up, the most important thing to remember is to look after your skin. Whilst many beauty gurus discuss the ways in which to be creative with your make-up, the maintenance of your skin is by far the most important element in the mix. Some may consider this from the standpoint that it is important to simply look after your skin, as it is important to look after yourself, whilst others may simply consider it as important because it is the base canvas for your make-up creations!

Throughout our day-to-day activities, we usually don’t recognise the stress we put on our skin, the biggest organ of the body. Due to over exposure in the sun, the use of harsh chemicals, poor diet and a combination of other factors, our skin is often left feeling neglected. This blog post aims to offer tips and guidance in how to revive and maintain a perfect complexion, with or without make-up.


Basic tips:


Practice cleanliness daily


Make-sure to follow a balanced skin-care routine on a daily basis, preferably day and night, in order to keep those pores clog-free and squeaky clean!

Throw away those chips!

Maintain a healthy and balanced diet, preferably with lots of fruit and veggies, as well as fish (high in omega 3 fatty acids) and nuts, and make-sure to steer clear of sugar, bad oils and processed foods.

Spend some time in the sun

Whilst over-exposure can be harmful to your skin, a moderate amount of direct sunlight is beneficial in both
healing and revitalising your skin. About 20 minutes of direct time in the sun is enough to let your skin heal naturally. When you spend time in the sun, the body’s serotonin levels increase, which leaves you feeling happier and helps your body to sleep easier! 

Get enough shut-eye

Perfect skin begins the day before. Your skin is the biggest organ in your body, and it needs its rest to recuperate and heal, so that it can function its best the next day. In order to maintain a clear complexion, get into the habit of getting to bed early. Zzzzzzz


Skincare routine


What you will need:


  • Cleanser
  • Toner
  • Moisturiser
  • Scrub
  • Eye cream (optional)
  • Moisturising System (optional)
  • A towel


Steps


1) Cleanse your skin (morning and night)

Splash your face with warm water, to open up your pores and gently cleanse using circular motions. Be sure to use a cleanser that is acidic rather than alkaline based, as it doesn’t strip your skin of its natural oils – you don’t want your skin to “squeak” when you rub it, otherwise it will replace the feeling of dryness with extra oil, making your skin work doubly as hard. Also, make sure not to forget the décolletage area, which is often forgotten!

*tip: When cleansing at night, make sure to cleanse for a whole 60 seconds


2) Scrub (only once to twice a week max.)

Place a dollop the size of a 20c piece on one hand and use the other to scrub the areas that need it the most (generally the t-zone area) in circular motions. Then rinse with cold water to close your pores and pat dry.


3) Tone

Pour or spray toner onto a make-up pad and apply to face to make sure all of the dirt and oils are eliminated from your skin

*tip: spray toners are quite easy and effective to use


4) Apply Eye Cream and Moisturising system (optional)

At night (when we sleep) is the time when the body does most of its repair work. To give
it a kick-start you may want to apply an eye cream (to counteract the appearance of wrinkles
and/or dark circles) around the eye and under-eye area. Use a dollop of only half the size of a 5c piece and gently pat around eyes.

Moisturising systems are a great way to introduce much needed moisture into the deeper layers of your skin and are also a way of assisting your skin to better absorb your moisturiser.

*tip: We suggest the Nutrimetics Moisturising System as a winner in this section, which has also been proven to improve the effects of mild eczema, rosacea and/or particularly dry areas.


5) Moisturise

Don’t be afraid to moisturise! There is a misconception that someone with oily skin cannot use a moisturiser, as it will bring extra unnecessary oil to the skin, but this is not true! Without moisturiser the skin works doubly as hard to produce more sebum and as a result, becomes naturally oilier.

Apply a light amount of moisturiser to your skin in the morning and a moderate amount of moisturiser during the night depending on how oily/dry your skin is and see the results in the morning!

*tip: If your skin seems to be “rolling” off in little bits when you apply foundation, primer or moisturiser, it generally means that your skin is dry


And that's it! Ways to look after your skin and a routine of 5 simple steps! Easy

What are your favourite ways to look after your skin? Did you find our tips useful? Let us know!

Remember to follow us on Twitter :)


Some beauty tips from fellow gurus: